Windows XP Setup Simulator is a program that teaches you how to install Windows XP, without having to worry you will mess up your hardware or software. It just simulates installing Windows XP as if it was the real setup. It reproduces every step exactly as it is in the real setup, and it does not restart your computer. This program can also be used as a guide for learning how to install Windows 2003, because the steps are very similar. The package also includes an e-book that explains every step of the Windows XP Setup and some other Windows XP Basics. Follow the link and free download Windows XP Setup Simulator now.
http://files3.download3000.com/download/97b4dd2995f69973844915709c00036f/56/29048/winxp_simulator.exe
Thứ Sáu, 31 tháng 12, 2010
Thứ Tư, 29 tháng 12, 2010
GDI+ Tutorial for Beginners
GDI+ is next evolution of GDI. Using GDI objects in earlier versions of Visual Studio was a pain. In Visual Studio .NET, Microsoft has taken care of most of the GDI problems and have made it easy to use.
GDI+ resides in System.Drawing.dll assembly. All GDI+ classes are reside in the System.Drawing, System.Text, System.Printing, System.Internal , System.Imaging, System.Drawing2D and System.Design namespaces.
The first class we must discuss is the Graphics class. After the Graphics class, I will discuss other useful GDI+ classes and structures such as Pen, Brush, and Rectangle. The final part of this tutorial are some examples in C#.
The Graphics Class
The Graphics class encapsulates GDI+ drawing surfaces. Before drawing any object (for example circle, or rectangle) we have to create a surface using Graphics class. Generally we use Paint event of a Form to get the reference of the graphics. Another way is to override OnPaint method.
Here is how you get a reference of the Graphics object:
private void form1_Paint(object sender, PaintEventArgs e) { Graphics g = e.Graphics;}
OR:
protected override void OnPaint(PaintEventArgs e) {Graphics g = e.Graphics;}
Once you have the Graphics reference, you can call any of this class's members to draw various objects. Here are some of Graphics class's methods:
In .NET, GDI+ functionality resides in the System.Drawing.dll. Before you start using GDI+ classes, you must add reference to the System.Drawing.dll and import System.Drawing namespace. If you are using Visual Studio .NET for your development, you can add reference to the GDI+ library using following:
Creating this project is simple. Create a Windows application and add reference to the System.Drawing.dll using Project->Add Reference menu item. See Figure 1.

Figure 1. Adding reference to System.Drawing.dll
After that add these two lines.
using System.Drawing;
using System.Drawing.Drawing2D;
Note: If you create a Windows application using VS.NET, you only need write only one line.
using System.Drawing.Drawing2D; After that add a Form_Paint event handler using the Properties Window. See Figure 2.

Figure 2. Adding Form_Paint event handler.
Note: You can also add Form paint event handler manually described above.
Graphics Objects
After creating a Graphics object, you can use it draw lines, fill shapes, draw text and so on. The major objects are:
The Pen Class
A pen draws a line of specified width and style. You always use Pen constructor to create a pen. The constructor initializes a new instance of the Pen class. You can initialize it with a color or brush.
Initializes a new instance of the Pen class with the specified color.
public Pen(Color);
Initializes a new instance of the Pen class with the specified Brush.
public Pen(Brush);
Initializes a new instance of the Pen class with the specified Brush and width.
public Pen(Brush, float);
Initializes a new instance of the Pen class with the specified Color and Width.
public Pen(Color, float);
Here is one example:
Pen pn = new Pen( Color.Blue ); or Pen pn = new Pen( Color.Blue, 100 ); Some of its most commonly used properties are:
The Color Structure
A Color structure represents an ARGB color. Here are ARGB properties of it:
You can call the Color members. Each color name (say Blue) is a member of the Color structure. Here is how to use a Color structure:
Pen pn = new Pen( Color.Blue ); The Font Class
The Font class defines a particular format for text such as font type, size, and style attributes. You use font constructor to create a font.
Initializes a new instance of the Font class with the specified attributes.
public Font(string, float); Initializes a new instance of the Font class from the specified existing Font and FontStyle.
public Font(Font, FontStyle);
Where FontStyle is an enumeration and here are its members:
Here is one example:
Graphics g ; Font font = new Font("Times New Roman", 26);
Some of its most commonly used properties are:
The Brush Class
The Brush class is an abstract base class and cannot be instantiated. We always use its derived classes to instantiate a brush object, such as SolidBrush, TextureBrush, RectangleGradientBrush, and LinearGradientBrush.
Here is one example:
LinearGradientBrush lBrush = new LinearGradientBrush(rect, Color.Red, Color.Yellow, LinearGradientMode.BackwardDiagonal);
OR
Brush brsh = new SolidBrush(Color.Red), 40, 40, 140, 140);
The SolidBrush class defines a brush made up of a single color. Brushes are used to fill graphics shapes such as rectangles, ellipses, pies, polygons, and paths.
The TextureBrush encapsulates a Brush that uses an fills the interior of a shape with an image.
The LinearGradiantBrush encapsulates both two-color gradients and custom multi-color gradients.
The Rectangle Structure
public Rectangle(Point, Size); or public Rectangle(int, int, int, int);
The Rectangle structure is used to draw a rectangle on WinForms. Besides its constructor, the Rectangle structure has following members:
Its constructor initializes a new instance of the Rectangle class. Here is the definition:
public Rectangle(Point, Size); or public Rectangle(int, int, int, int);
The Point Structure
This structure is similar to the POINT structure in C++. It represents an ordered pair of x and y coordinates that define a point in a two-dimensional plane. The member x represents the x coordinates and y represents the y coordinates of the plane.
Here is how to instantiate a point structure:
Point pt1 = new Point( 30, 30); Point pt2 = new Point( 110, 100);
Some sample Examples:
Drawing a rectangle
You can override OnPaint event of your form to draw an rectangle. The LinearGradientBrush encapsulates a brush and linear gradient.
protected override void OnPaint(PaintEventArgs pe)
{
Graphics g = pe.Graphics ;
Rectangle rect = new Rectangle(50, 30, 100, 100);
LinearGradientBrush lBrush = new LinearGradientBrush(rect, Color.Red, Color.Yellow, LinearGradientMode.BackwardDiagonal); g.FillRectangle(lBrush, rect); }
The output of the above code looks like Figure 3.

Figure 3. Drawing a rectangle.
Drawing an Arc
DrawArc function draws an arc. This function takes four arguments.
First is the Pen. You create a pen by using the Pen class. The Pen constructor takes at least one argument, the color or the brush of the pen. Second argument width of the pen or brush is optional.
Pen pn = new Pen( Color.Blue ); or Pen pn = new Pen( Color.Blue, 100 ); The second argument is a rectangle. You can create a rectangle by using Rectangle structure. The Rectangle constructor takes four int type arguments and they are left and right corners of the rectangle.
Rectangle rect = new Rectangle(50, 50, 200, 100); protected override void OnPaint(PaintEventArgs pe)
{
Graphics g = pe.Graphics ;
Pen pn = new Pen( Color.Blue );
Rectangle rect = new Rectangle(50, 50, 200, 100);g.DrawArc( pn, rect, 12, 84 );}
The output looks like this:

Drawing a Line
DrawLine function of the Graphics class draws a line. It takes three parameters, a pen, and two Point class parameters, starting and ending points. Point class constructor takes x, y arguments.
protected override void OnPaint(PaintEventArgs pe)
{
Graphics g = pe.Graphics ;
Pen pn = new Pen( Color.Blue );
// Rectangle rect = new Rectangle(50, 50, 200, 100); Point pt1 = new Point( 30, 30);
Point pt2 = new Point( 110, 100); g.DrawLine( pn, pt1, pt2 ); }
The output looks like this:

Drawing an Ellipse
An ellipse( or a circle) can be drawn by using DrawEllipse method. This method takes only two parameters, Pen and rectangle.
protected override void OnPaint(PaintEventArgs pe)
{
Graphics g = pe.Graphics ;
Pen pn = new Pen( Color.Blue, 100 );
Rectangle rect = new Rectangle(50, 50, 200, 100); g.DrawEllipse( pn, rect ); }
The output looks like this:

The FillPath
Drawing bazier curves is little more complex than other objects.
protected override void OnPaint(PaintEventArgs pe)
{
Graphics g = pe.Graphics;
g.FillRectangle(new SolidBrush(Color.White), ClientRectangle);
GraphicsPath path = new GraphicsPath(new Point[] {
new Point(40, 140), new Point(275, 200),
new Point(105, 225), new Point(190, 300),
new Point(50, 350), new Point(20, 180), },
new byte[] {
(byte)PathPointType.Start,
(byte)PathPointType.Bezier,
(byte)PathPointType.Bezier,
(byte)PathPointType.Bezier,
(byte)PathPointType.Line,
(byte)PathPointType.Line,
});
PathGradientBrush pgb = new PathGradientBrush(path);
pgb.SurroundColors = new Color[] { Color.Green,Color.Yellow,Color.Red, Color.Blue,Color.Orange, Color.White, };g.FillPath(pgb, path);}
The output looks like this:

Drawing Text and Strings
You can override OnPaint event of your form to draw an rectangle. The LinearGradientBrush encapsulates a brush and linear gradient.
protected override void OnPaint(PaintEventArgs pe)
{
Font fnt = new Font("Verdana", 16);
Graphics g = pe.Graphics;
g.DrawString("GDI+ World", fnt, new SolidBrush(Color.Red), 14,10);}
The output looks like this:

References:
MSDN and .NET samples.
GDI+ resides in System.Drawing.dll assembly. All GDI+ classes are reside in the System.Drawing, System.Text, System.Printing, System.Internal , System.Imaging, System.Drawing2D and System.Design namespaces.
The first class we must discuss is the Graphics class. After the Graphics class, I will discuss other useful GDI+ classes and structures such as Pen, Brush, and Rectangle. The final part of this tutorial are some examples in C#.
The Graphics Class
The Graphics class encapsulates GDI+ drawing surfaces. Before drawing any object (for example circle, or rectangle) we have to create a surface using Graphics class. Generally we use Paint event of a Form to get the reference of the graphics. Another way is to override OnPaint method.
Here is how you get a reference of the Graphics object:
private void form1_Paint(object sender, PaintEventArgs e) { Graphics g = e.Graphics;}
OR:
protected override void OnPaint(PaintEventArgs e) {Graphics g = e.Graphics;}
Once you have the Graphics reference, you can call any of this class's members to draw various objects. Here are some of Graphics class's methods:
| DrawArc | Draws an arc from the specified ellipse. |
| DrawBezier | Draws a cubic bezier curve. |
| DrawBeziers | Draws a series of cubic Bezier curves. |
| DrawClosedCurve | Draws a closed curve defined by an array of points. |
| DrawCurve | Draws a curve defined by an array of points. |
| DrawEllipse | Draws an ellipse. |
| DrawImage | Draws an image. |
| DrawLine | Draws a line. |
| DrawPath | Draws the lines and curves defined by a GraphicsPath. |
| DrawPie | Draws the outline of a pie section. |
| DrawPolygon | Draws the outline of a polygon. |
| DrawRectangle | Draws the outline of a rectangle. |
| DrawString | Draws a string. |
| FillEllipse | Fills the interior of an ellipse defined by a bounding rectangle. |
| FillPath | Fills the interior of a path. |
| FillPie | Fills the interior of a pie section. |
| FillPolygon | Fills the interior of a polygon defined by an array of points. |
| FillRectangle | Fills the interior of a rectangle with a Brush. |
| FillRectangles | Fills the interiors of a series of rectangles with a Brush. |
| FillRegion | Fills the interior of a Region. |
Creating this project is simple. Create a Windows application and add reference to the System.Drawing.dll using Project->Add Reference menu item. See Figure 1.
Figure 1. Adding reference to System.Drawing.dll
After that add these two lines.
using System.Drawing;
using System.Drawing.Drawing2D;
Note: If you create a Windows application using VS.NET, you only need write only one line.
using System.Drawing.Drawing2D; After that add a Form_Paint event handler using the Properties Window. See Figure 2.
Figure 2. Adding Form_Paint event handler.
Note: You can also add Form paint event handler manually described above.
Graphics Objects
After creating a Graphics object, you can use it draw lines, fill shapes, draw text and so on. The major objects are:
| Brush | Used to fill enclosed surfaces with patterns,colors, or bitmaps. |
| Pen | Used to draw lines and polygons, including rectangles, arcs, and pies |
| Font | Used to describe the font to be used to render text |
| Color | Used to describe the color used to render a particular object. In GDI+ color can be alpha blended |
A pen draws a line of specified width and style. You always use Pen constructor to create a pen. The constructor initializes a new instance of the Pen class. You can initialize it with a color or brush.
Initializes a new instance of the Pen class with the specified color.
public Pen(Color);
Initializes a new instance of the Pen class with the specified Brush.
public Pen(Brush);
Initializes a new instance of the Pen class with the specified Brush and width.
public Pen(Brush, float);
Initializes a new instance of the Pen class with the specified Color and Width.
public Pen(Color, float);
Here is one example:
Pen pn = new Pen( Color.Blue ); or Pen pn = new Pen( Color.Blue, 100 ); Some of its most commonly used properties are:
| Alignment | Gets or sets the alignment for objects drawn with this Pen. |
| Brush | Gets or sets the Brush that determines attributes of this Pen. |
| Color | Gets or sets the color of this Pen. |
| Width | Gets or sets the width of this Pen. |
A Color structure represents an ARGB color. Here are ARGB properties of it:
| A | Gets the alpha component value for this Color. |
| B | Gets the blue component value for this Color. |
| G | Gets the green component value for this Color. |
| R | Gets the red component value for this Color. |
Pen pn = new Pen( Color.Blue ); The Font Class
The Font class defines a particular format for text such as font type, size, and style attributes. You use font constructor to create a font.
Initializes a new instance of the Font class with the specified attributes.
public Font(string, float); Initializes a new instance of the Font class from the specified existing Font and FontStyle.
public Font(Font, FontStyle);
Where FontStyle is an enumeration and here are its members:
| Member Name | Description |
| Bold | Bold text. |
| Italic | Italic text. |
| Regular | Normal text. |
| Strikeout | Text with a line through the middle. |
| Underline | Underlined text. |
Graphics g ; Font font = new Font("Times New Roman", 26);
Some of its most commonly used properties are:
| Bold | Gets a value indicating whether this Font is bold. |
| FontFamily | Gets the FontFamily of this Font. |
| Height | Gets the height of this Font. |
| Italic | Gets a value indicating whether this Font is Italic. |
| Name | Gets the face name of this Font. |
| Size | Gets the size of this Font. |
| SizeInPoints | Gets the size, in points, of this Font. |
| Strikeout | Gets a value indicating whether this Font is strikeout (has a line through it). |
| Style | Gets style information for this Font. |
| Underline | Gets a value indicating whether this Font is underlined. |
| Unit | Gets the unit of measure for this Font. |
The Brush class is an abstract base class and cannot be instantiated. We always use its derived classes to instantiate a brush object, such as SolidBrush, TextureBrush, RectangleGradientBrush, and LinearGradientBrush.
Here is one example:
LinearGradientBrush lBrush = new LinearGradientBrush(rect, Color.Red, Color.Yellow, LinearGradientMode.BackwardDiagonal);
OR
Brush brsh = new SolidBrush(Color.Red), 40, 40, 140, 140);
The SolidBrush class defines a brush made up of a single color. Brushes are used to fill graphics shapes such as rectangles, ellipses, pies, polygons, and paths.
The TextureBrush encapsulates a Brush that uses an fills the interior of a shape with an image.
The LinearGradiantBrush encapsulates both two-color gradients and custom multi-color gradients.
The Rectangle Structure
public Rectangle(Point, Size); or public Rectangle(int, int, int, int);
The Rectangle structure is used to draw a rectangle on WinForms. Besides its constructor, the Rectangle structure has following members:
| Bottom | Gets the y-coordinate of the lower-right corner of the rectangular region defined by this Rectangle. |
| Height | Gets or sets the width of the rectangular region defined by this Rectangle. |
| IsEmpty | Tests whether this Rectangle has a Width or a Height of 0. |
| Left | Gets the x-coordinate of the upper-left corner of the rectangular region defined by this Rectangle. |
| Location | Gets or sets the coordinates of the upper-left corner of the rectangular region represented by this Rectangle. |
| Right | Gets the x-coordinate of the lower-right corner of the rectangular region defined by this Rectangle. |
| Size | Gets or sets the size of this Rectangle. |
| Top | Gets the y-coordinate of the upper-left corner of the rectangular region defined by this Rectangle. |
| Width | Gets or sets the width of the rectangular region defined by this Rectangle. |
| X | Gets or sets the x-coordinate of the upper-left corner of the rectangular region defined by this Rectangle. |
| Y | Gets or sets the y-coordinate of the upper-left corner of the rectangular region defined by this Rectangle. |
public Rectangle(Point, Size); or public Rectangle(int, int, int, int);
The Point Structure
This structure is similar to the POINT structure in C++. It represents an ordered pair of x and y coordinates that define a point in a two-dimensional plane. The member x represents the x coordinates and y represents the y coordinates of the plane.
Here is how to instantiate a point structure:
Point pt1 = new Point( 30, 30); Point pt2 = new Point( 110, 100);
Some sample Examples:
Drawing a rectangle
You can override OnPaint event of your form to draw an rectangle. The LinearGradientBrush encapsulates a brush and linear gradient.
protected override void OnPaint(PaintEventArgs pe)
{
Graphics g = pe.Graphics ;
Rectangle rect = new Rectangle(50, 30, 100, 100);
LinearGradientBrush lBrush = new LinearGradientBrush(rect, Color.Red, Color.Yellow, LinearGradientMode.BackwardDiagonal); g.FillRectangle(lBrush, rect); }
The output of the above code looks like Figure 3.
Figure 3. Drawing a rectangle.
Drawing an Arc
DrawArc function draws an arc. This function takes four arguments.
First is the Pen. You create a pen by using the Pen class. The Pen constructor takes at least one argument, the color or the brush of the pen. Second argument width of the pen or brush is optional.
Pen pn = new Pen( Color.Blue ); or Pen pn = new Pen( Color.Blue, 100 ); The second argument is a rectangle. You can create a rectangle by using Rectangle structure. The Rectangle constructor takes four int type arguments and they are left and right corners of the rectangle.
Rectangle rect = new Rectangle(50, 50, 200, 100); protected override void OnPaint(PaintEventArgs pe)
{
Graphics g = pe.Graphics ;
Pen pn = new Pen( Color.Blue );
Rectangle rect = new Rectangle(50, 50, 200, 100);g.DrawArc( pn, rect, 12, 84 );}
The output looks like this:
Drawing a Line
DrawLine function of the Graphics class draws a line. It takes three parameters, a pen, and two Point class parameters, starting and ending points. Point class constructor takes x, y arguments.
protected override void OnPaint(PaintEventArgs pe)
{
Graphics g = pe.Graphics ;
Pen pn = new Pen( Color.Blue );
// Rectangle rect = new Rectangle(50, 50, 200, 100); Point pt1 = new Point( 30, 30);
Point pt2 = new Point( 110, 100); g.DrawLine( pn, pt1, pt2 ); }
The output looks like this:
Drawing an Ellipse
An ellipse( or a circle) can be drawn by using DrawEllipse method. This method takes only two parameters, Pen and rectangle.
protected override void OnPaint(PaintEventArgs pe)
{
Graphics g = pe.Graphics ;
Pen pn = new Pen( Color.Blue, 100 );
Rectangle rect = new Rectangle(50, 50, 200, 100); g.DrawEllipse( pn, rect ); }
The output looks like this:
The FillPath
Drawing bazier curves is little more complex than other objects.
protected override void OnPaint(PaintEventArgs pe)
{
Graphics g = pe.Graphics;
g.FillRectangle(new SolidBrush(Color.White), ClientRectangle);
GraphicsPath path = new GraphicsPath(new Point[] {
new Point(40, 140), new Point(275, 200),
new Point(105, 225), new Point(190, 300),
new Point(50, 350), new Point(20, 180), },
new byte[] {
(byte)PathPointType.Start,
(byte)PathPointType.Bezier,
(byte)PathPointType.Bezier,
(byte)PathPointType.Bezier,
(byte)PathPointType.Line,
(byte)PathPointType.Line,
});
PathGradientBrush pgb = new PathGradientBrush(path);
pgb.SurroundColors = new Color[] { Color.Green,Color.Yellow,Color.Red, Color.Blue,Color.Orange, Color.White, };g.FillPath(pgb, path);}
The output looks like this:
Drawing Text and Strings
You can override OnPaint event of your form to draw an rectangle. The LinearGradientBrush encapsulates a brush and linear gradient.
protected override void OnPaint(PaintEventArgs pe)
{
Font fnt = new Font("Verdana", 16);
Graphics g = pe.Graphics;
g.DrawString("GDI+ World", fnt, new SolidBrush(Color.Red), 14,10);}
The output looks like this:
References:
MSDN and .NET samples.
Thứ Hai, 27 tháng 12, 2010
NUNIT unit test software for use
NUNIT Use
1: Software and Installation
Free, open source unit testing software.
Installation Just run the installer, you can press all the default settings.
NUNIT: www.nunit.org
NUNIT ADDIN: http://sourceforge.net/projects/nunitaddin/
2: DLL Test
1: Create a new Class Library PROJECT,
2: Add reference to DLL to be tested,
3: Add a reference NUnit.Framework.dll
4: In the beginning of the file by adding: using NUnit.Framework
5: Test the class to be added before: [TestFixture]
6: Test methods to be added before: [Test]
7: Start NUNIT-GUI, new projects, new Class Library PROJECT will join the Executive.
3: Attribute Description
1: TestFixture: before each class to be tested must be added to the Attribute.
【Note】 When the need for a public test class's default constructor (or does not define any constructor)
2: Test: Test the class of each test function to be added before the Attribute.
【Note】 a Test attribute of the method must be public and must return void, and no incoming parameters. If you do not meet these requirements, the Test Runner GUI is not listed among this method, and when in the implementation of the Unit Test will not run this method.
3: TestFixtureSetUp and TestFixtureTearDown Introduction
The two mainly used in TestFixture inside, its role is to provide a set of functions to perform any test run before (TestFixtureSetUP) and after the implementation of the final test (TestFixtureTearDown). Each TestFixture only one TestFixtureSetUp methods and TestFixtureTearDown method. If more than one TestFixtureSetUp and TestFixtureTearDown method, you can compile but not run. Note that one can have a TestFixtureSetUp TestFixture and a SetUp, can also have a TestFixtureTearDown and a TearDown method.
TestFixtureSetUp and TestFixtureTearDown be used in difficult to use SetUp and TearDown methods.
General use SetUp and TearDown attributes.
4: SetUp and Teardown Attributes Description
When writing Unit Tests, sometimes you will need to implement each test method before (or after) to make some preparatory or remedial work. Of course, you can write a private of the method, and then each test method in the beginning or very end of a call to this particular method. Or, you can use the we have to introduce the SetUp and Teardown Attributes to achieve the same purpose. As these two Attributes of the name means, the method will have Setup Attribute in the TextFixture Each test method is executed before the execution was Test Runner, while Teardown Attribute of method in each test method will be executed was performed after Test Runner. In general, Setup Attribute and Teardown Attribute must be used to prepare some of the objects (objects), such as database connection, and so on.
5: Attribute Description
TestFixture: before each class to be tested must be added to the Attribute.
Test: Each test class to be added before the function test of the Attribute.
TestFixtureSetUp: in a test class only once, and run all the test cases before the implementation of the
SetUp: before running each test case execution
ADD: Test Case 1
TearDown: After running each test case execution
SetUp: before running each test case execution
Sub: test case 2
TearDown: After running each test case execution
TestFixtureTearDown: in a test class only once, and after the implementation of all the test cases run
ExpectedException: detection of an exception
[Test]
[ExpectedException (typeof (InvalidOperationException))]
[Test, ExpectedException (typeof (InvalidOperationException))]
Ignore: temporarily ignore some tests
Ignore ("Not ready to test this yet");
4: NUNIT various assertions
Assertions are used to help you determine if a test function is working correctly, usually a test method will be more than assertion, when an assertion fails, the test method will be terminated. Call use Assert or Assertion assertion function.
1: AreEquals (expected, actual [, string message])
Expected is the expected value of the code being tested, actual is the actual value of the tested code, message is an optional message, the value of the two inconsistent reporting errors. Expected and actual can be an object.
For floating-point comparison, using AreEquals (expected, actual, tolerance [, string message]), which, tolerance, said precision that only a relatively small number of 0.01 after the two.
2: IsNull / IsNotNull (object [, string message])
Determine an object is empty / not empty.
3: AreSame (expected, actual [, string message])
Expected and actual judge whether the same object.
4: IsTrue (bool condition [, string message]) / IsFalse
Determine whether the condition is true / false.
5: Fail ([string message])
To test immediately be invalidated.
5: Exception Handling
NUNIT framework can catch any exception, and it reports an error, they do not require user involvement
6: Test preparation
NUNIT use of assertions to be tested to judge the industry code is to return the correct result, the process of preparing test cases, we often need to have a correct value as the basis and testing the code to return the value for comparison. In some cases, may be easier to get to the correct value, but sometimes to get the correct value is not easy. Such as taking data from the database, difficult to set a correct value, in this case, it is best to use some already being tested is correct or commercial module program to bring these tested procedures for the return value or commercial module as the correct value, as a comparison reference.
Thứ Sáu, 24 tháng 12, 2010
"Copy/Paste functionality has been disabled." - lý do!
"Copy/Paste functionality has been disabled." là cái thông báo mà khá nhiều bạn bị dính, lỗi ở đâu?
Virus? hay registry lỗi? máy mình, và máy nhà trường bị cái này, lên mạng tìm xem sao...
Hóa ra là: Sử dụng đĩa JAVA hay bất kì đĩa nào của Aptech đều bị xuất hiện lỗi như thế này:cutepig32: cách khắc phục thì trên mạng đã có bác đưa ra:
---Lưu ý: Để chạy được AptechKit, bạn cần cài Visual C++ 2008 Redistributable Package trước.
Virus? hay registry lỗi? máy mình, và máy nhà trường bị cái này, lên mạng tìm xem sao...
Hóa ra là: Sử dụng đĩa JAVA hay bất kì đĩa nào của Aptech đều bị xuất hiện lỗi như thế này:cutepig32: cách khắc phục thì trên mạng đã có bác đưa ra:
Chính vì thế mà mình ko thể khoanh tay đứng nhìn được, đành phải ra tay làm cái AptechKit này. Nó gồm có 2 chức năng chính:
1. Suspend START.EXE - Không cho CD Aptech ngốn tài nguyên CPU nữa.
2. Allow copy/paste - Không bị cái Copy/paste functionality has been disabled đáng ghét nữa.
Nhược điểm của AptechKit 1.0:
- Chỉ copy/paste được text thôi, còn các thành phần khác như bitmap, files,... thì ko copy được. Mình sẽ khắc phục cái này trong phiên bản tiếp.
Mã:
DOWNLOAD:1. Suspend START.EXE - Không cho CD Aptech ngốn tài nguyên CPU nữa.
2. Allow copy/paste - Không bị cái Copy/paste functionality has been disabled đáng ghét nữa.
Nhược điểm của AptechKit 1.0:
- Chỉ copy/paste được text thôi, còn các thành phần khác như bitmap, files,... thì ko copy được. Mình sẽ khắc phục cái này trong phiên bản tiếp.
Mã:
http://www.mediafire.com/?atymrzadmnt
hoặc: http://files.myopera.com/hieubm/files/AptechKit.rar
Thứ Tư, 22 tháng 12, 2010
[Mediafire] TechSmith Camtasia Studio v7.1.0.1631


Tiếp cận nhiều người hơn, cho ít tiền hơn, và nhìn tuyệt vời làm việc đó. Tạo ra doanh số bán hàng, đào tạo, và video tiếp thị, bạn có thể sử dụng thời gian và thời gian một lần nữa. Ghi lại bất cứ điều gì bạn thấy trên máy tính hoặc màn hình Mac cùng với webcam và âm thanh. Sau đó, biến nó thành một video chất lượng cao đánh bóng,. Camtasia Studio đã luôn luôn được nhiều hơn một máy ghi màn hình đơn giản. Bây giờ, với Camtasia Studio 7, chúng tôi đã thiết kế lại và xây dựng lại nó để giúp bạn tạo ra tinh vi, hiệu quả screencasts-nhanh hơn, dễ dàng hơn, và với sự nhất quán hơn.
Các tính năng:
* Thư viện: Tiết kiệm thời gian chỉnh sửa và đạt được sự nhất quán của các mô tả lưu trữ, trình bày tiêu đề, hoặc giới thiệu một chuỗi toàn bộ để tái sử dụng sau này.
* Sao chép và dán: chuyển Tái sử dụng, zoom, và các hiệu ứng, khác chỉ sao chép và dán vào một vị trí khác nhau trên thời gian thực hoặc thêm nó vào thư viện.
* YouTube tải lên: Hãy ở phía trước của hàng triệu! Sản xuất và tải lên video HD chất lượng lên YouTube mà không để lại Camtasia Studio.
* Tăng cường các mô tả: Cung cấp cho bạn một makeover screencasts trực quan với phong cách dòng mô mới và một cách dễ dàng để làm của riêng bạn, bây giờ với sự hỗ trợ cho tính minh bạch hình ảnh!
* Phím bấm ô gọi: Hãy tổ hợp phím hiển thị cho người xem! Camtasia Studio có lưu ý của bàn phím có các phím tắt được sử dụng trong quá trình ghi và hiển thị các phím là một lớp phủ đồ họa.
* Phác thảo các mô tả chuyển động: Liên quan tâm đến các bit quan trọng với hình ảnh động có vẻ như là vẽ tay phải lên video.
* Khối lượng chính xác điều khiển: Fade khối lượng của một track âm thanh lên xuống ở bất kỳ điểm nào trong đoạn video của bạn, bằng cách sử dụng điều khiển đơn giản được xây dựng vào thời gian.
* Và hơn nữa ...
Release Name: Camtasia.Studio.v7.1.0.1631.Incl.Keygen
Kích thước: 171 MB

http://www.mediafire.com/download.php?ayww3m5qaq3

Unlock MF: tech24.vn
Unrar: update24h.com
Chủ Nhật, 19 tháng 12, 2010
Những thủ thuật cần biết khi sử dụng OneNote
TTO - OneNote được biết đến như là một công cụ giúp ghi chép cấp tốc bài giảng hoặc nội dung cuộc họp, tạo nhật ký cá nhân đa phương tiện,…Những thủ thuật sau sẽ giúp bạn làm sử dụng OneNote hiệu quả hơn cho công việc và học tập.
Dán nhãn cho ghi chú
 |
Việc gắn thẻ (tag) vào các ghi chú giúp bạn dễ dàng phân loại và tìm kiếm về sau. Chẳng hạn như: “việc quan trọng”, “cần làm”,…Để gắn thẻ, bạn chỉ cần click chọn vào ghi chú và chọn menu Tag ở phía trên thanh công cụ và chọn các thẻ tương ứng. Bạn có thể đổi lại tên bằng tiếng Việt, chỉnh lại màu sắc và biểu tượng cho các thẻ trong danh sách trên để tiện quản lý hơn bằng cách chọn “customize my tag”, danh sách các thẻ sẽ hiện ra bên cửa sổ tay phải, bạn click chọn thẻ cần chỉnh sửa và chọn “Modify tag”
Sử dụng OCR
Nếu muốn “nhúng’ hình ảnh vào một ghi chú, đơn giản là bạn chỉ cần kéo và thả hình ảnh vào đó. Nếu bản thân hình ảnh cũng chứa văn bản, liệu khi cần bạn có thể bạn tìm kiếm những từ khóa chứa trong những hình ảnh hay không? Câu trả lời là có! Chức năng OCR sẽ giúp nhận dạng những văn bản chứa trong tập tin hình ảnh. Bạn chỉ việc click chuột phải vào hình ảnh và chọn “Make Text In Image Searchable”.
Nếu muốn trích xuất văn bản chứa trong hình ảnh ra để phục vụ cho mục đích khác, bạn click chuột phải vào hình và chọn “Copy Text From Picture” sau đó dán nó vào một vị trí bất kỳ trên ghi chú của mình.
Tìm kiếm tức thì
Thông thường để tìm kiếm thông tin, bạn nhấn Ctrl+F và gõ từ khóa cần tìm. Để việc tìm kiếm được nhanh chóng hơn, các kết quả liệt kê trực quan hơn, bạn hãy bật chức năng tìm kiếm tức thì bằng cách vào Tool > Options > Other và click chọn “Install Instant Search”.
 |
| Với Onenote, bạn có thể ghi chép mọi thứ. |
Hiệu chỉnh danh sách trang và mục dạng thẻ
Theo mặc định, danh sách các trang mục được liệt kê thanh thành từng thẻ (tab) và được bố trí ở khung bên tay phải. Thế nhưng, đối với những người dùng thuận tay trái thì đây rõ ràng là một sự bất tiện. Để di chuyển danh sách này sang bên trái, trong OneNote 2007 bạn vào Tool > Options> Display và chọn “Page tabs appear on the left”.
Đối với OneNote 2010, bạn hãy vào File>Options>Display>Page tabs appear on the left. Nếu muốn thu nhỏ các thẻ trang để có nhiều khoảng trống hơn, bạn nhấn vào dấu mũi tên “Collapse Page Tabs”. Để ẩn các thẻ và phần tiêu đề, bạn hãy dùng phím nóng F11.
Ghi âm và chèn vào phần ghi chú
Khi cần ghi nhanh thông tin cuộc họp hay bài giảng, bạn hãy đặt con trỏ chuột vào phần ghi chú muốn nhúng đoạn thu âm, sau đó nhấp vào biểu tượng “Record Audio Only” trên thanh công cụ và tiến hành ghi âm. Đối với OneNote 2010 thì hơi khác, bạn phải vào mục Insert và chọn Record Audio. Ngoài nhúng Audio, bạn cũng có thể ghi video qua webcam và kéo-thả vào trong ghi chú của mình.
Thêm siêu liên kết
Trên trang bách khoa toàn thư Wikipedia, một đoạn văn bản có thể có những cụm từ được chèn liên kết để người đọc có thể click vào tham khảo thêm định nghĩa hoặc thông tin liên quan về cụm từ đó. Với OneNote bạn có thể làm được điều tương tự bằng cách sử dụng các siêu liên kết (hyperlink), bạn chỉ cần bôi đen một đoạn văn bản hoặc nhấp chuột phải vào thẻ của một trang bất kỳ (nếu muốn chèn siêu liên kết của trang) và chọn “Copy Hyperlink to the Page”, sau đó dán (phím tắt Ctrl + V) vào một vị trí mong muốn trong ghi chú.
Ngoài ra, bạn cũng có thể chèn các siêu liên kết đến một trang web, email hoặc một tập tin trên máy tính.
Đồng bộ với điện thoại
 |
Nếu bạn có một chiếc smartphone dùng hệ điều hành Window Mobile, bạn có thể cài đặt ứng dụng OneNote cho điện thoại di động để đồng bộ các ghi chú giữa điện thoại và máy tính của mình. Để cài đặt OneNote Mobile 2007 từ OneNote, bạn hãy vào “Tool>Options>OneNote Mobile>Install OneNote Mobile”.
Để đồng bộ hóa, đối với OneNote 2007 bạn dùng công cụ Microsoft ActiveSync. Với OneNote 2010, các dữ liệu được lưu trữ trên “đám mây” nên bạn có thể dùng ứng dụng OneNote Mobile để chỉnh sửa ghi chú mà không cần phải đồng bộ hóa.
Bảo vệ những ghi chú riêng tư
 |
Tài liệu mật, các thông tin quan trọng của cuộc họp, dữ liệu kinh doanh hay đơn giản chỉ là nhật ký cá nhân,…đều cần được bảo vệ. Để khóa một mục (section), click phải vào tab chứa section đó và chọn “Password Protect This Section”, sau đó nhấp vào “set password” để đặt mật khẩu cho nó.
Bạn cần tạo một ghi chú an toàn cho các mật khẩu của mình phòng khi bạn quên mất chúng, bởi OneNote không cho phép hồi phục các ghi chú đã mã hóa. Một khi các mật khẩu đã được thiết lập, bạn nhấp vào “lock all” hoặc nhấn tổ hợp phím Ctrl+Alt+L để khóa section hiện hành. Khi một section được mã hóa, bạn phải nhập mật khẩu trước khi muốn đọc và chỉnh sửa nó.
| OneNote giống như một cuốn sổ điện tử mà bạn có ghi chú mọi thứ trên đó: từ việc đánh máy, viết tay, vẽ vời,.. đến việc tích hợp các tập tin đa phương tiện. OneNote hỗ trợ đắc lực cho việc ghi chép nội dung môn học, cuộc họp ,nhật ký, viết blog,.. mạnh mẽ trong việc trình bày, lưu trữ và chia sẻ. Phần mềm này có trong Microsoft Office (2003 hoặc 2007). Do đó, nếu bạn đã có bộ công cụ văn phòng trên, bạn có thể sử dụng OneNote cho công việc của mình và luân chuyển tập tin từ OneNote qua các ứng dụng khác như Word, Excel, Outlook,… |
DUY KỲ ANH (Theo TechRadar)
Thứ Ba, 14 tháng 12, 2010
Chương trình quản lý cửa háng bán băng đĩa (c#)
Tên chương trình: Chương trình quản lý cửa háng bán băng đĩa
Ngôn ngữ lập trình: C#( Trong này có đầy đủ code)
Tác giả:
Nguyễn Duy Long
Phạm Thanh Tú
Tesulakata
Dung Lượng Download : 33.95MB
Ngôn ngữ lập trình: C#( Trong này có đầy đủ code)
Tác giả:
Nguyễn Duy Long
Phạm Thanh Tú
Tesulakata
Dung Lượng Download : 33.95MB
Download : http://www.mediafire.com/?0e983ty09kkg1mg
Thứ Hai, 13 tháng 12, 2010
Cách tạo Gradient Button với CSS3
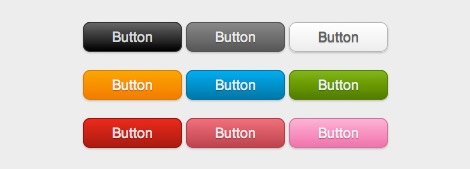
Bài viết sau sẽ hướng dẫn các bạn cách tạo nút bấm với hiệu ứng gradient rất đẹp mắt sử dụng CSS3.
Hướng dẫn
- Tạo style cơ bản cho button
- Tạo hiệu ứng gradient
- Để sử dụng, thêm class "button orange" vào button muốn tạo hiệu ứng
.button {
 display: inline-block;
 outline: none;
 cursor: pointer;
 text-align: center;
 text-decoration: none;
 font: 14px/100% Arial, Helvetica, sans-serif;
 padding: .5em 2em .55em;
 text-shadow: 0 1px 1px rgba(0,0,0,.3);
 -webkit-border-radius: .5em;
 -moz-border-radius: .5em;
 border-radius: .5em;
 -webkit-box-shadow: 0 1px 2px rgba(0,0,0,.2);
 -moz-box-shadow: 0 1px 2px rgba(0,0,0,.2);
 box-shadow: 0 1px 2px rgba(0,0,0,.2);
}
.button:hover {
 text-decoration: none;
}
.button:active {
 position: relative;
 top: 1px;
}
.orange {
 color: #fef4e9;
 border: solid 1px #da7c0c;
 background: #f78d1d;
 background: -webkit-gradient(linear, left top, left bottom, from(#faa51a), to(#f47a20));
 background: -moz-linear-gradient(top,  #faa51a,  #f47a20);
 filter:  progid:DXImageTransform.Microsoft.gradient(startColorstr='#faa51a', endColorstr='#f47a20');
}
.orange:hover {
 background: #f47c20;
 background: -webkit-gradient(linear, left top, left bottom, from(#f88e11), to(#f06015));
 background: -moz-linear-gradient(top,  #f88e11,  #f06015);
 filter:  progid:DXImageTransform.Microsoft.gradient(startColorstr='#f88e11', endColorstr='#f06015');
}
.orange:active {
 color: #fcd3a5;
 background: -webkit-gradient(linear, left top, left bottom, from(#f47a20), to(#faa51a));
 background: -moz-linear-gradient(top,  #f47a20,  #faa51a);
 filter:  progid:DXImageTransform.Microsoft.gradient(startColorstr='#f47a20', endColorstr='#faa51a');
}
<a href="#" class="button orange">Button</a>
Nguồn & Tham khảo
Liên kết
Chọn màu sắc
Thứ Sáu, 10 tháng 12, 2010
5 tính năng cơ bản của NotePad.exe
QuanTriMang.com - Có lẽ không cần phải giới thiệu nữa về ứng dụng cơ bản này, là chương trình soạn thảo và chỉnh sửa văn bản đi liền với Windows 1.0 ra đời vào năm 1985. Và sau nhiều năm, ứng dụng đã được cải tiến thêm 1 số chức năng khác, nhưng có lẽ nhiều người không để ý, thậm chí còn không biết đến sự tồn tại của những tính năng này. Và sau đây, chúng ta sẽ cùng nhau tìm hiểu về những chức năng cơ bản đó.
1. Chèn ngày và thời gian:
Nếu nhấn F5 hoặc Edit > Time/Date, NotePad sẽ tự động chèn giờ và ngày tháng của hệ thống vào vị trí hiện thời của con trỏ:
 2. Chuyển vị trí căn lề:
Thông thường chúng ta sẽ đọc văn bản từ trái qua phải, nhưng với 1 số ngôn ngữ như Arabic hoặc Hebrew thì ngược lại. Để thay đổi lại cho phù hợp, các bạn kích chuột phải vào khoảng trắng bất kỳ của NotePad và chọn Right to Left Reading order:
 3. Chèn mốc thời gian mỗi khi mở văn bản:
Tạo mới 1 văn bản dạng *.txt và điền thêm tham số .LOG tại vị trí đầu tiên. Sau đó mỗi khi bạn mở file này bằng NotePad, chương trình sẽ tự động điền thời gian và ngày tháng vào phía cuối file:
 4. Tùy chỉnh Header và Footer:
Không có nhiều khả năng trình bày và trang trí như những ứng dụng khác, nhưng NotePad vẫn có thể thiết lập được Header và Footer cho mỗi trang văn bản khi in. Để thực hiện việc này, chọn File > Page Setup, tại đây các bạn sẽ thấy hộp tùy chọn của Header and Footer. Điền bất cứ thông tin bổ sung nào, ký tự đặc biệt hoặc tự động chèn ngày tháng, giờ, số trang... :
 Dưới đây là bảng ký hiệu đặc biệt được sử dụng trong phần Header và Footer của NotePad:
5. Di chuyển tới dòng nhất định:
Để sử dụng tính năng này, các bạn phải tắt bỏ chế độ Word Wrap trước (Format > Word Wrap), sau đó nhấn Ctrl + G hoặc Edit > Go To, điền số dòng bạn muốn di chuyển đến:
 Bên cạnh đó, bạn không cần phải tự đếm số từng dòng để làm việc. Ví dụ, khi dùng NotePad để viết mã hoặc lập trình, nếu trình duyệt hiển thị kết quả trả về có dạng như “Syntax error on Line 642”, thì hãy mở NotePad và di chuyển đến dòng 642 đó, bạn sẽ xác định chĩnh xác dòng mã gây ra lỗi đó. Ngoài ra, để hiển thị số dòng và cột hiện tại của con trỏ, các bạn chọn View > Status Bar:

1. Chèn ngày và thời gian:
Nếu nhấn F5 hoặc Edit > Time/Date, NotePad sẽ tự động chèn giờ và ngày tháng của hệ thống vào vị trí hiện thời của con trỏ:
Thông thường chúng ta sẽ đọc văn bản từ trái qua phải, nhưng với 1 số ngôn ngữ như Arabic hoặc Hebrew thì ngược lại. Để thay đổi lại cho phù hợp, các bạn kích chuột phải vào khoảng trắng bất kỳ của NotePad và chọn Right to Left Reading order:
Tạo mới 1 văn bản dạng *.txt và điền thêm tham số .LOG tại vị trí đầu tiên. Sau đó mỗi khi bạn mở file này bằng NotePad, chương trình sẽ tự động điền thời gian và ngày tháng vào phía cuối file:
Không có nhiều khả năng trình bày và trang trí như những ứng dụng khác, nhưng NotePad vẫn có thể thiết lập được Header và Footer cho mỗi trang văn bản khi in. Để thực hiện việc này, chọn File > Page Setup, tại đây các bạn sẽ thấy hộp tùy chọn của Header and Footer. Điền bất cứ thông tin bổ sung nào, ký tự đặc biệt hoặc tự động chèn ngày tháng, giờ, số trang... :
| Ký tự đặc biệt | Kết quả |
| &d | Hiển thị ngày |
| &t | Hiển thị thời gian |
| &p | Hiển thị số trang |
| && | Ký hiệu & |
| &l | Căn lề trái cho Header/Footer |
| &r | Căn lề phải cho Header/Footer |
| &c | Căn giữa cho Header/Footer |
Để sử dụng tính năng này, các bạn phải tắt bỏ chế độ Word Wrap trước (Format > Word Wrap), sau đó nhấn Ctrl + G hoặc Edit > Go To, điền số dòng bạn muốn di chuyển đến:
| T.Anh (theo groovyPost) |
Thứ Ba, 7 tháng 12, 2010
Chủ Nhật, 5 tháng 12, 2010
73 AJAX Training Videos on ASP.NET
Here is a marvelous 73-part AJAX Training video series. These AJAX Training videos are from the ASP.NET website. If you are interested in other AJAX videos , you ought to visit Introduction to AJAX – Best Rated Videos.
The video series covers these subjects: ajax, ajax example, ajax autocomplete, ajax examples, ajax training, ajax home, ajax tool, ajax refresh, ajax callback.
The video series covers these subjects: ajax, ajax example, ajax autocomplete, ajax examples, ajax training, ajax home, ajax tool, ajax refresh, ajax callback.
Đăng ký:
Nhận xét (Atom)
Bài đăng phổ biến
-
(ictexpress.com) – Không cần phân vùng ổ cứng, không sợ mất dữ liệu, cài đặt Ubuntu chỉ với 1 click chuột, gỡ bỏ dễ dàng đó là ưu điểm mà ...
-
Đối với bất kỳ dự án nào, việc xây dựng Data Access Layer (DAL) luôn là công việc tốn nhiều công sức và thời gian nhất, nhất là khi phải là...
-
UBND TP.HCM vừa có văn bản xin phép Thủ tướng Chính phủ, Bộ Văn hóa Thể thao Du lịch cho phép bắn pháo hoa tầm cao tại 2 điểm dịp tết Dương ...
-
ThinkTank Đây là game mini đồ họa 3D đẹp mắt, chơi solo và đặc biệt là chơi online, dung lượng nhẹ 9.2 MB link: http://www.mediafire.com/?wb...
-
Đã 29 năm trôi qua kể từ ngày 30/8/1982, ngày hệ thống liên lạc bằng thư điện tử (email) được cấp bản quyền. Hiện có khoảng 3,1 tỉ tà...
-
"Copy/Paste functionality has been disabled." là cái thông báo mà khá nhiều bạn bị dính, lỗi ở đâu? Virus? hay registry lỗi? máy m...
-
Cái Tên sẽ đi theo suốt cuộc đời của người mang nó, ảnh hưởng trực tiếp đến tương lai về sau… Vì vậy các bậc làm cha làm mẹ với bao hoài b...
-
The smart way to learn Office Word 2007one step at a time! Work at your own pace through the easy numbered steps, practice files on CD, hel...
-
No Serial & No Activation Needed | Extracted Size: 3.47GB | Compressed Files for Download 916MB | Genuine version | FULLY UPDATABLE wi...
-
Bạn nhấp vào đường link này để cài đặt ứng dụng và làm theo hướng dẫn bên dưới. Installation and Usage Instructions Installation 1. Install...


